Back to the main page Back to category Guitar Builder or Luthier Supply
musical instrument details
'Baby' Jolliffe (Ditson-based) Terz / Travel / Acoustic Guitar Kit for Luthier
Estimated price for orientation: 575 $
Category: Guitar Builder or Luthier Supply
Class:
Description Condition: New: A brand-new, unused, unopened, undamaged item in its original packaging (where packaging is applicable). Packaging should be the same as what is found in a retail store, unless the item is handmade or was packaged by the manufacturer in non-retail packaging, such as an unprinted box or plastic bag. See the seller's listing for full details. See all condition definitions- opens in a new window or tab ... Read moreabout the condition Brand: Jolliffe Country/Region of Manufacture: United Kingdom MPN: p41 / p42 Type: DIY Project Kit EAN: Does not apply
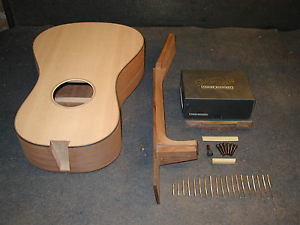
I quit! After a baker's decade spent making guitars, I'm running away to (re-)join the circus. Well, lab. Well, that's the plan. Anyway, to strengthen my resolve, I'm going to offer my unfinished guitars for sale. So, be you a repairer wanting to put something together without first taking it apart, a player hankering to make a guitar and seeking a head-start, or just a wondrously generous sort looking to pluck the strings of a certain someone's heart, may I humbly proffer some of the fruits of my failure. Jolliffe, Nicholas A., Hill Farm, Overstrand Abstract On offer here is an essentially assembly-ready guitar, supplied 'in the white', complete with Waverly #4060 machine-heads, bone nut and saddle, ebony bridge-pins and end-pins, and nickel-silver frets (Stewart-MacDonald #0148). Delivery is free to mainland UK, and remote technical support is promised if needed. Results These guitars are from a batch that followed a series of well-received prototypes. Although originally commissioned as a travel-guitar, hence the short-scale (~21.5"), they have apparently more than held their own gigging and recording. Scroll down for links to a couple of clips, if you want to take a look. The colour clip features the immediate precursor to this unfinished batch. Discussion Rest assured, I have decided against finishing these guitars through no fault of their own, just through a heady mix of disillusionment and practicality on my part. Every effort has been made in their construction thus-far. In fact, that's very much the problem. Whilst I'd like to believe that the guitars benefit from my unbridled, some might say unhinged, attention, it makes making them far from viable in my hands. So, what needs doing? Were it I, after a final sanding (and checking that the neck-profile suits), I'd mask the top under the fingerboard-tongue and bridge, and apply the finish. The bridge location has already been established by drilling (4mm bit) through the outer string-holes, and the preliminary neck-set has been done. The latter will be a little loose, and imperfect, but that's because it will need to accommodate the finish thickness, and inevitably require finalising after that's applied (see for the method I'd use). Once your finish of choice is ready, you'll need to scribe carefully around the bridge in-situ, and clear that area back to the wood. The bridge can then then be glued in place, giving you a target to aim for when you reappraise the neck-set. Once that's done, scribe around the fingerboard-tongue, remove that finish too, and glue the neck in place. The frets have been cut to length, undercut to accommodate the binding, and polished, so are ready to install once the fingerboard face has been finalised. There is a slight radius already on the face, but I normally tighten it towards the nut as part of that last levelling. The nut and saddle blanks have been fitted, and polished everywhere necessary that won't be shaped during set-up. The holes for the machine-heads have been drilled, the bush-rebates cut, and the screw-holes tapped, so they'll just need installing. The end-pin hole has already been reamed, so that'll be good to go in once the finish is cleared out of the way. That just leaves the bridge-pin holes to be reamed, and the string-slots to be cut, before the set-up can be tackled. Materials and Methods The back and sides, head-block and tail-block, neck and lining are all utile. Were I less scrupulous, I would call it mahogany. It is of that ilk, and indeed from that family. More importantly, it's good stuff. The back is one-piece, as is the neck-shaft and heel. The headstock is attached by means of a modified bridle joint (click and scroll down to see an example from a Martin guitar), and there is a similarly traditional tapered dovetail at the other end. The dovetail pocket should end under the 13th fret-slot, so as to help (as-yet hopefully unborn) repairers with any reset down the line (explained ). There is a less traditional carbon-fibre rod in the neck-shaft, to keep the weight down and the pessimists happy. The binding and tail-wedge are ebony, and the rosette is ebony and maple. The fingerboard, fingerboard-binding, headstock-veneer, heel-cap and bridge are all rosewood. The fan-braced top, and indeed all bracing, is sitka spruce, cut myself from split-billets. The bridge-plate is maple. References Frank Ford, Supplementary Data The body is approximately 11-1/4" wide, 17-1/2" long, 3-1/4" to 4-1/8" deep. The overall length of the assembled guitar is around 34-1/2". Figure 1. p39:
Click to view clip at vimeo.com Figure 2. p40:
Click to view clip at vimeo.com
Description
| Condition: | New: A brand-new, unused, unopened, undamaged item in its original packaging (where packaging is applicable). Packaging should be the same as what is found in a retail store, unless the item is handmade or was packaged by the manufacturer in non-retail packaging, such as an unprinted box or plastic bag. See the seller's listing for full details. See all condition definitions- opens in a new window or tab ... Read moreabout the condition | Brand: | Jolliffe |
| Country/Region of Manufacture: | United Kingdom | MPN: | p41 / p42 |
| Type: | DIY Project Kit | EAN: | Does not apply |
I quit! After a baker's decade spent making guitars, I'm running away to (re-)join the circus. Well, lab. Well, that's the plan. Anyway, to strengthen my resolve, I'm going to offer my unfinished guitars for sale. So, be you a repairer wanting to put something together without first taking it apart, a player hankering to make a guitar and seeking a head-start, or just a wondrously generous sort looking to pluck the strings of a certain someone's heart, may I humbly proffer some of the fruits of my failure. Jolliffe, Nicholas A., Hill Farm, Overstrand Abstract On offer here is an essentially assembly-ready guitar, supplied 'in the white', complete with Waverly #4060 machine-heads, bone nut and saddle, ebony bridge-pins and end-pins, and nickel-silver frets (Stewart-MacDonald #0148). Delivery is free to mainland UK, and remote technical support is promised if needed. Results These guitars are from a batch that followed a series of well-received prototypes. Although originally commissioned as a travel-guitar, hence the short-scale (~21.5"), they have apparently more than held their own gigging and recording. Scroll down for links to a couple of clips, if you want to take a look. The colour clip features the immediate precursor to this unfinished batch. Discussion Rest assured, I have decided against finishing these guitars through no fault of their own, just through a heady mix of disillusionment and practicality on my part. Every effort has been made in their construction thus-far. In fact, that's very much the problem. Whilst I'd like to believe that the guitars benefit from my unbridled, some might say unhinged, attention, it makes making them far from viable in my hands. So, what needs doing? Were it I, after a final sanding (and checking that the neck-profile suits), I'd mask the top under the fingerboard-tongue and bridge, and apply the finish. The bridge location has already been established by drilling (4mm bit) through the outer string-holes, and the preliminary neck-set has been done. The latter will be a little loose, and imperfect, but that's because it will need to accommodate the finish thickness, and inevitably require finalising after that's applied (see for the method I'd use). Once your finish of choice is ready, you'll need to scribe carefully around the bridge in-situ, and clear that area back to the wood. The bridge can then then be glued in place, giving you a target to aim for when you reappraise the neck-set. Once that's done, scribe around the fingerboard-tongue, remove that finish too, and glue the neck in place. The frets have been cut to length, undercut to accommodate the binding, and polished, so are ready to install once the fingerboard face has been finalised. There is a slight radius already on the face, but I normally tighten it towards the nut as part of that last levelling. The nut and saddle blanks have been fitted, and polished everywhere necessary that won't be shaped during set-up. The holes for the machine-heads have been drilled, the bush-rebates cut, and the screw-holes tapped, so they'll just need installing. The end-pin hole has already been reamed, so that'll be good to go in once the finish is cleared out of the way. That just leaves the bridge-pin holes to be reamed, and the string-slots to be cut, before the set-up can be tackled. Materials and Methods The back and sides, head-block and tail-block, neck and lining are all utile. Were I less scrupulous, I would call it mahogany. It is of that ilk, and indeed from that family. More importantly, it's good stuff. The back is one-piece, as is the neck-shaft and heel. The headstock is attached by means of a modified bridle joint (click and scroll down to see an example from a Martin guitar), and there is a similarly traditional tapered dovetail at the other end. The dovetail pocket should end under the 13th fret-slot, so as to help (as-yet hopefully unborn) repairers with any reset down the line (explained ). There is a less traditional carbon-fibre rod in the neck-shaft, to keep the weight down and the pessimists happy. The binding and tail-wedge are ebony, and the rosette is ebony and maple. The fingerboard, fingerboard-binding, headstock-veneer, heel-cap and bridge are all rosewood. The fan-braced top, and indeed all bracing, is sitka spruce, cut myself from split-billets. The bridge-plate is maple. References Frank Ford, Supplementary Data The body is approximately 11-1/4" wide, 17-1/2" long, 3-1/4" to 4-1/8" deep. The overall length of the assembled guitar is around 34-1/2".
Figure 1. p39:
Click to view clip at vimeo.com
Click to view clip at vimeo.com
Figure 2. p40:
Click to view clip at vimeo.com
Click to view clip at vimeo.com